Hello Helical Insight,
I am using Helical Insight 4.0. Can I implement tabs at dashboard level ?
Thank you

Hello Helical Insight,
I am using Helical Insight 4.0. Can I implement tabs at dashboard level ?
Thank you
Hello,
Yes…We can implement tabs at dashboard level using HTML. Below is a sample example of how to do that, in a similar way you can make changes at your end and add more functions etc.
TAB IMPLEMENTATION AT DASHBOARD:
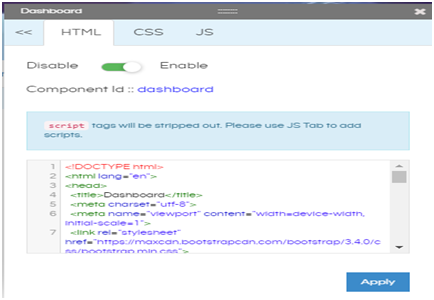
Go to the Dashboard Designer -> Right click on anywhere -> In the dialogue box click on Advance -> HTML -> Enable.
HTML Code:
< !DOCTYPE html >
< html lang=“en” >
< head >
< title>Dashboard
< meta charset=“utf-8” >
< meta name=“viewport” content=“width=device-width, initial-scale=1” >
< link rel=“stylesheet” href=“https://maxcdn.bootstrapcdn.com/bootstrap/3.4.0/css/bootstrap.min.css” >
< /head >
< img src=“getExternalResource.html?path=Image/welcome.jpg” alt=“Dashboard” style=“width:100%;height:auto;”>
< body>
< div class=“grid-stack-wrapper hi-custom-component” >
< div class=“component-container” id=“czb0ni4atbg” >
< div style=“width:100%” >
< ul>
< li class=“active” >< a href="#home">Bar Chart< /a>< /li>
< li class="#summary" >< a href="#summary">Pie Chart< /a>< /li>
< li>< a href="#dip">Time series chart< /a>< /li>
< li>< a href="#dip-c">Child Tabular report< /a>< /li>
< li>< a href="#civ">Parent Tabular report< /a>< /li>
< /ul>
< div class=“tab-content” >
< div class=“tab-pane active” id=“home” >
< iframe id=“homeIFrame” data-src=“http://localhost:8085/hi-ee/hi.html?dir=1627303617624&file=6a6f27ff-f7e7-4e80-8af7-b1bec8f2d5a8.report&mode=open”>
< /iframe>
< /div>
< div class=“tab-pane” id=“summary”>
< iframe id=“summaryIFrame” data-src=“http://localhost:8085/hi-ee/hi.html?dir=1626862918258&file=7aed6d9c-a963-4cb6-a1eb-26da3d8e2d51.report&mode=open”>
< /iframe>
< /div>
< div class=“tab-pane” id=“dip”>
< iframe id=“dipIFrame” data-src=“http://localhost:8085/hi-ee/hi.html?dir=1626862918258&file=66d0e341-1dcd-4bf8-8517-528a59daf3a8.report&mode=open”>
< /iframe>
< /div>
< div class=“tab-pane” id=“dip-c”>
< iframe id=“dipcIFrame” data-src=“http://localhost:8085/hi-ee/hi.html?dir=1626862918258&file=b2e3789f-5e17-4494-b348-d5e219a54183.report&mode=open”>
< /iframe>
< /div>
< div class=“tab-pane” id=“civ” >
< iframe id=“civIFrame” data-src=“http://localhost:8085/hi-ee/hi.html?dir=1626862918258&file=ea0204f9-60d3-477e-a330-238e166d2180.report&mode=open”>
< /iframe>
< /div>
< /div>
< /div>
< /div>
< /div>
Once these changes are made click on the apply button. Refer to below image.
Now move on to the CSS -> Enable.
Add the below code :
.grid-stack .grid-stack-item .grid-stack-wrapper {
margin: 0 10px;
margin-top: 0px;
margin-right: 10px;
margin-bottom: 0px;
margin-left: 10px;
border-radius: 4px;
border-top-left-radius: 4px;
border-top-right-radius: 4px;
border-bottom-right-radius: 4px;
border-bottom-left-radius: 4px;
border: 1px solid #ccc;
height: 100%;
width: calc(100% - 20px);
background: #fff;
position: relative;
overflow: hidden;
overflow-x: hidden;
overflow-y: hidden;
}
.grid-stack .grid-stack-item .component-container {
display: -webkit-box;
display: flex;
height: calc(100% - 30px);
}
.nav {
margin-bottom: 0;
padding-left: 0;
list-style: none;
list-style-type: none;
list-style-position: initial;
list-style-image: initial;
}
.nav-tabs {
border-bottom: 1px solid #ddd;
border-bottom-width: 1px;
border-bottom-style: solid;
border-bottom-color: rgb(221, 221, 221);
}
#tabs{
width: 100%;
}
.tab-pane{
padding: 0;
}
#homeIFrame, #summaryIFrame, #dipIFrame,#dipcIFrame, #civIFrame{
width: 100%;
border: none;
height: 950px;
}
a{
text-decoration: none;
}
.nav-tabs>li>a {
margin-right: 2px;
line-height: 1.42857143;
border: 1px solid transparent;
border-radius: 4px 4px 0 0;
}
.nav>li>a {
padding: 10px 15px;
padding-top: 10px;
padding-right: 15px;
padding-bottom: 10px;
padding-left: 15px;
}
.nav>li, .nav>li>a {
margin-right: 2px;
line-height: 1.42857143;
border: 1px solid transparent;
border-top-color: transparent;
border-top-style: solid;
border-top-width: 1px;
border-right-color: transparent;
border-right-style: solid;
border-right-width: 1px;
border-bottom-color: transparent;
border-bottom-style: solid;
border-bottom-width: 1px;
border-left-color: transparent;
border-left-style: solid;
border-left-width: 1px;
border-image-source: initial;
border-image-slice: initial;
border-image-width: initial;
border-image-outset: initial;
border-image-repeat: initial;
border-radius: 4px 4px 0 0;
border-top-left-radius: 4px;
border-top-right-radius: 4px;
border-bottom-right-radius: 0px;
border-bottom-left-radius: 0px;
}
a {
overflow: hidden;
vertical-align: middle;
}
#hi-cache-fileTitle, .column-alias, a {
text-overflow: ellipsis;}
a {
background-color: transparent;
color: #337ab7;
text-decoration: none;
text-decoration-line: none;
text-decoration-style: initial;
text-decoration-color: initial;
}
*, :after, :before {
box-sizing: border-box;
}
li {
display: list-item;
text-align: -webkit-match-parent;
}
ul{
display: block;
list-style-type: disc;
-webkit-margin-before: 1em;
-webkit-margin-after: 1em;
-webkit-margin-start: 0px;
-webkit-margin-end: 0px;
-webkit-padding-start: 40px;
}
If you want to make any custom changes you can add them here. Once done click on the apply button.
Now move to the JS-> Enable.
Add the below JS Code.
$( document ).ready(function() {
$(“ul#tabs a”).click(function(e){
e.preventDefault();
$(this).tab(“show”);
}).on(“shown.bs.tab”, function(e) {
var elem = $(e.target),
frame = $(elem.attr(“href”)).find(“iframe”);
if (frame.length && !frame.attr(“src”)) {
frame.attr(“src”, frame.attr(“data-src”));
}
});
var f = $(“iframe”).eq(0);
f.attr(“src”, f.attr(“data-src”));
});
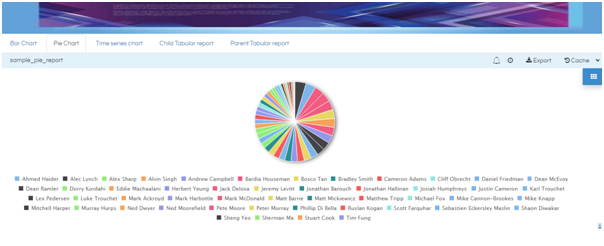
Once you add this code click on Apply button. Now you can view the tabs and reports as you have applied. A sample of it will be like below:
Thank you for reaching out to us!